Thrift Flips Part II

Hello Thrifties!
Over the years, I've had loads of fun giving old items a new lease on life, and many of them are still proudly displayed in my home. I'm all about inspiring you to get creative and transform unused stuff into awesome pieces for your space. Don't feel restricted by an item's original purpose - let your imagination run wild!
Repurposing Ideas:
Turn any container into a plant pot - like my quirky Troll planter!
Use wine racks for storing rolled towels.
Transform upside-down hamper baskets into tables with a glass top.
When you approach things with an open mind, the possibilities are truly endless. Let's get crafting!
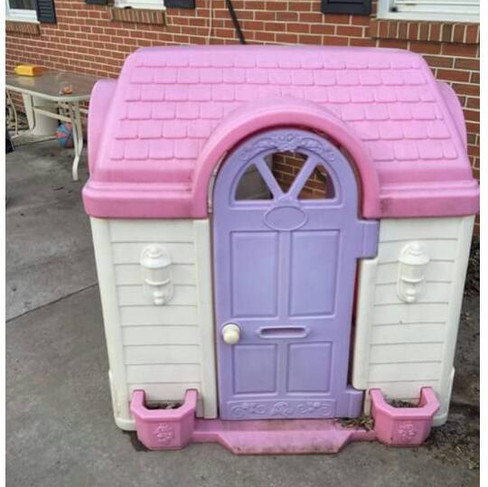
The Outdoor Playhouse
Starting with one of my beloved transformations, here's a project that anyone can easily accomplish with a bit of spray paint. I had saved a picture of the painted outdoor playhouse on my Pinterest board long before I began blogging, and it remains one of my most popular personal pins. These playhouses can often be found at a low cost or even for free on Marketplace and Craigslist. They typically appear faded and covered in cobwebs. I purchased mine from a friend for $50, and thankfully, she pressure washed it before I picked it up because, to be honest, I have a major fear of spiders!🕷️
If yours is dirty, your first step would be to give it a good, thorough cleaning and let it dry completely. Since mine was already disassembled, I painted each piece individually, which worked out well. Otherwise, you'll need to tape off the areas you don't want painted. I started with a spray primer for plastics; this is an important step as it allows you to use any spray paint and helps with adhesion. Then I took the cheapest spray paints I could find and did the larger sections. The details were done in basic acrylic craft paints and everything was sealed with a spray sealer designed for outdoor use. I will say, you WILL use a ton of spray cans to get good coverage. You can also use this technique on any outdoor plastic toys such as the coupes and picnic tables. We have some harsh winters here in PA, and combined with the constant sap from the neighbors' trees, ours did take a beating. I had it for about 7 years before I sold it. While it did need touch-ups, but the majority of the paint (especially the detailing) stayed intact.


The Vintage Highchair
This was a labor of love for a few reasons. First, it was for my first grandchild, and second because it was a collaboration between my mom (aka Mama Thrifty) and myself. She provided the sewing skills, and I did the prep and painting. I got this high chair for $10 off Marketplace. I liked that it was wood and had an arched back. I knew we could do something cool with it. First, I cleaned and sanded. Then I used a eco friendly low voc black paint for furniture. I then applied a food-safe shellac to heavily coat the tray and any areas that glam-baby might chew on. I searched until I found a vintage pattern that would work for the cover, and Mama Thrifty sewed and embellished it with her amazing skills. If you don't have a Thrifty Mama, you can always buy a cover, be sure to check that it's compatible with your chair style. Baby Momma picked out the fabric. Black was also her chosen color for the high chair itself, as she wanted a black nursery. Because it wasn't up to modern-day standards, I added a 3 point strap system which is no longer available but these high chair straps are better for safety. Also, with the extra fabric, I made a pattern of the kidney-shaped tray, cut the fabric out in that shape, and had it laminated at Office Max as a placemat. I will say the chair did hold up well and because it was one of a kind, and it sold rather quickly when she outgrew it.


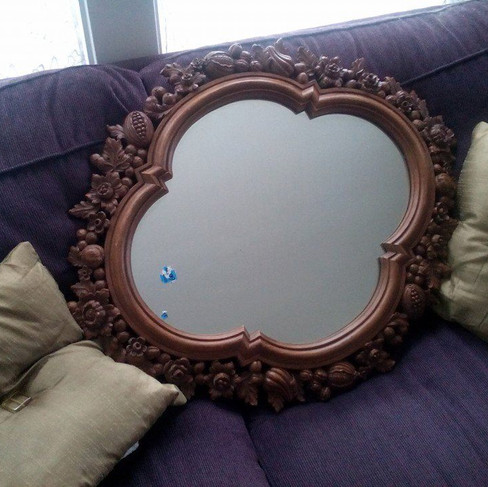
The Burwood Mirror
Remember pre-Home Interiors, the faux wood plastic material that sconces, mirrors, and wall baskets were made out of? Believe it or not, I love them! Usually, they are very embellished and easy to paint, plus their light weight makes them ideal for hanging just about anywhere. When I did my dining room, I was obsessed with the quatrefoil shape (a symmetrical design shape with four connected foils or lobes). So when I came across this mirror at Goodwill for around $6, I couldn't have scooped it up fast enough. The shape I loved, but the faux wood grain finish I did not. My solution was to apply silver leafing to the entire mirror to hide the finish. This was the first time I ever used this technique, and it did take a little bit of practice, but you really can't mess it up! The hardest part is handling the thin foil pieces as they are fragile and will blow out of your hand easily. The end result is breathtaking and I've gotten many compliments on it. Since I'm now redoing my dining room, this piece will be listed for sale soon, so inquire if you love it!


The French Provencial End Tables
Here's another Marketplace score for only $20 for the pair, actually from the same seller as the high chair, just months later. During my French Provincial phase, I was scoring as much of this style of furniture as I could and giving them chalk paint makeovers. Many pieces I kept, others I sold. I especially like the minimally distressed look with this furniture style, but the possibilities are endless.
For these, there was damage to the top where the veneer was missing. I heard that you could use auto body bondo to repair it. Fortunately, Mr. Thrifty is a mechanic and had some at his shop. It was a two-part solution and very stinky and toxic! I recommend you don't do this yourself unless you have experience handling this nasty stuff! This product is similar but easier for the DIY'er to handle. I don't have any firsthand experience with it but have heard it provides good results. The bondo repair dried to a rock-solid finish, and once it was painted, you couldn't even tell. I chalk painted the bottom and lightly sanded to distress slightly and used a technique I created to give the illusion of a stained top finish. I used two shades of brown paint samples in a matte finish, paint one solid, let dry, then use the other shade and dry brush with a chip brush keeping the brush strokes. Then take a tinted gel poly stain and apply with a sponge brush to soften the lines. I proceeded to apply several coats of polyacrylic to protect the tops. To protect the painted areas, I used wax over the chalk paint. The original hardware was given some bling with a slight wipe of silver rub and buff. These practical tables graced my living room for many years and are now in storage as I'd like to use them for nightstands for a future bedroom makeover.


If you look closely, you'll see a silver music box. I got it for $0.25 at a yard sale, but the music didn't play, so I removed it, lined it with a cut-up zip lock bag, and used it as a planter. I also did another one, this time scoring the jewelry box from a free pile at a yard sale. Once again, proving my point that nearly anything can become a planter!


What have you created or recreated with second hand finds! I'd love some inspiration!
Wait....there's more! Subscribe for Part III!
As an Amazon Associate I earn from qualifying purchases.


Comentários